
 Flushing your water heater is an important maintenance step to ensure you get the most out of your water heater. By keeping your water heater clean from sediment buildup, you help ensure the maximum life is reached from this important home appliance.
To help you flush your water heater properly, please refer to the instructions below, provided by Paul Robischon, Manager of Washington Water Service.
How to Flush Your Water Heater
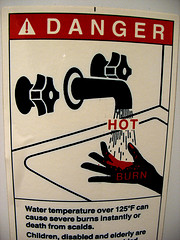
CAUTION: When flushing your water heater there is danger of being scalded. Be careful and keep children and pets away during the procedure.
Water heater manufacturers recommend flushing sediment from your storage type water heater periodically. How often your model needs to be flushed depends upon the quality of the water in your area. Areas with high mineral content will have to flush more often.
What is sediment, and why is it a problem? The sediment is sand or other grit from a well, or any other material that has gotten into the municipal water mains. Sediment can also come into your home after the water company flushes out their lines.
Over time, your heater can accumulate this sediment consisting of sand, gravel, grit, and various mineral deposits. This buildup can reduce the amount your water heater holds, create a variety of interesting noises, and reduce the efficiency of your unit. The buildup of sediment at the bottom can harden and sometimes clog the drain valve.
Cleaning this sediment out of your water heater is not particularly difficult; here is how to do it.
- If your water heater is gas, set the gas valve to “Pilot” to prevent the burners from coming on while you are flushing it. If your heater is electric, be sure to turn off the circuit breakers. With an electric water heater, if the water level drops below the heating elements, and the thermostat turns the elements on, the heating elements will probably burn out quite rapidly.
- Connect a heavy-duty garden hose to the drain valve at the bottom of the tank. Make sure the outlet of the hose is in a safe area away from pets and children. It can be very hot and can scald quickly.
- Close the shut off valve on the cold inlet to the water heater.
- Carefully open the temperature/pressure relief valve at the top of the tank by lifting the lever. Leave the valve open.
- Open the drain valve at the bottom of the heater allowing the water to flow out through the garden hose. If the sediment is clogging the drain valve then try closing the temperature/pressure relief valve and turn the cold inlet valve back on to “power flush” the sediment out.
- In some cases, the sediment hardens into large chunks that can block the drain valve. If so, then wait until everything cools down, remove the garden hose from the drain valve, remove the valve if necessary, and use a long screw driver to break up the clog. This is a very messy procedure. Once completed, re-attach the hose and continue flushing.
- Drain the tank completely. With the drain valve still open, close the pressure relief valve and turn the cold water inlet valve back on. This will scour the bottom of the tank and flush the sediment out. Flush the tank until the water runs clear. When the garden hose runs clear, you are finished.
- Close the drain valve at the bottom of the tank and remove the garden hose.
- Close the pressure relief valve at the top of the tank if it is still open, and turn the cold inlet valve back on.
- Open a hot water faucet in your house, and let it run until no air bubbles come out.
- Turn the heater back on, and with gas units re-light the pilot if necessary.
Washington Water Service